November 14, 2017
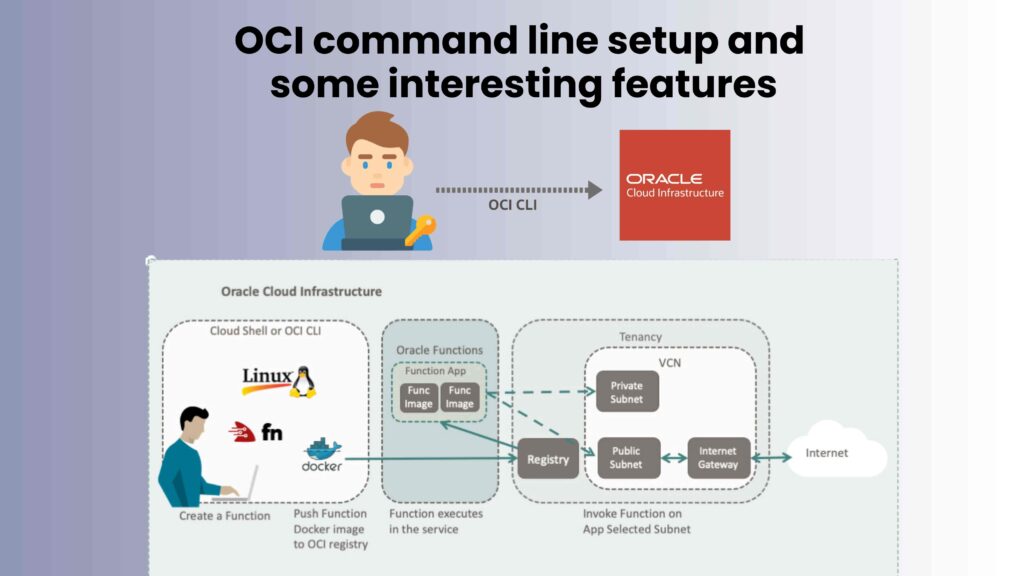
OCI command line setup and some interesting features
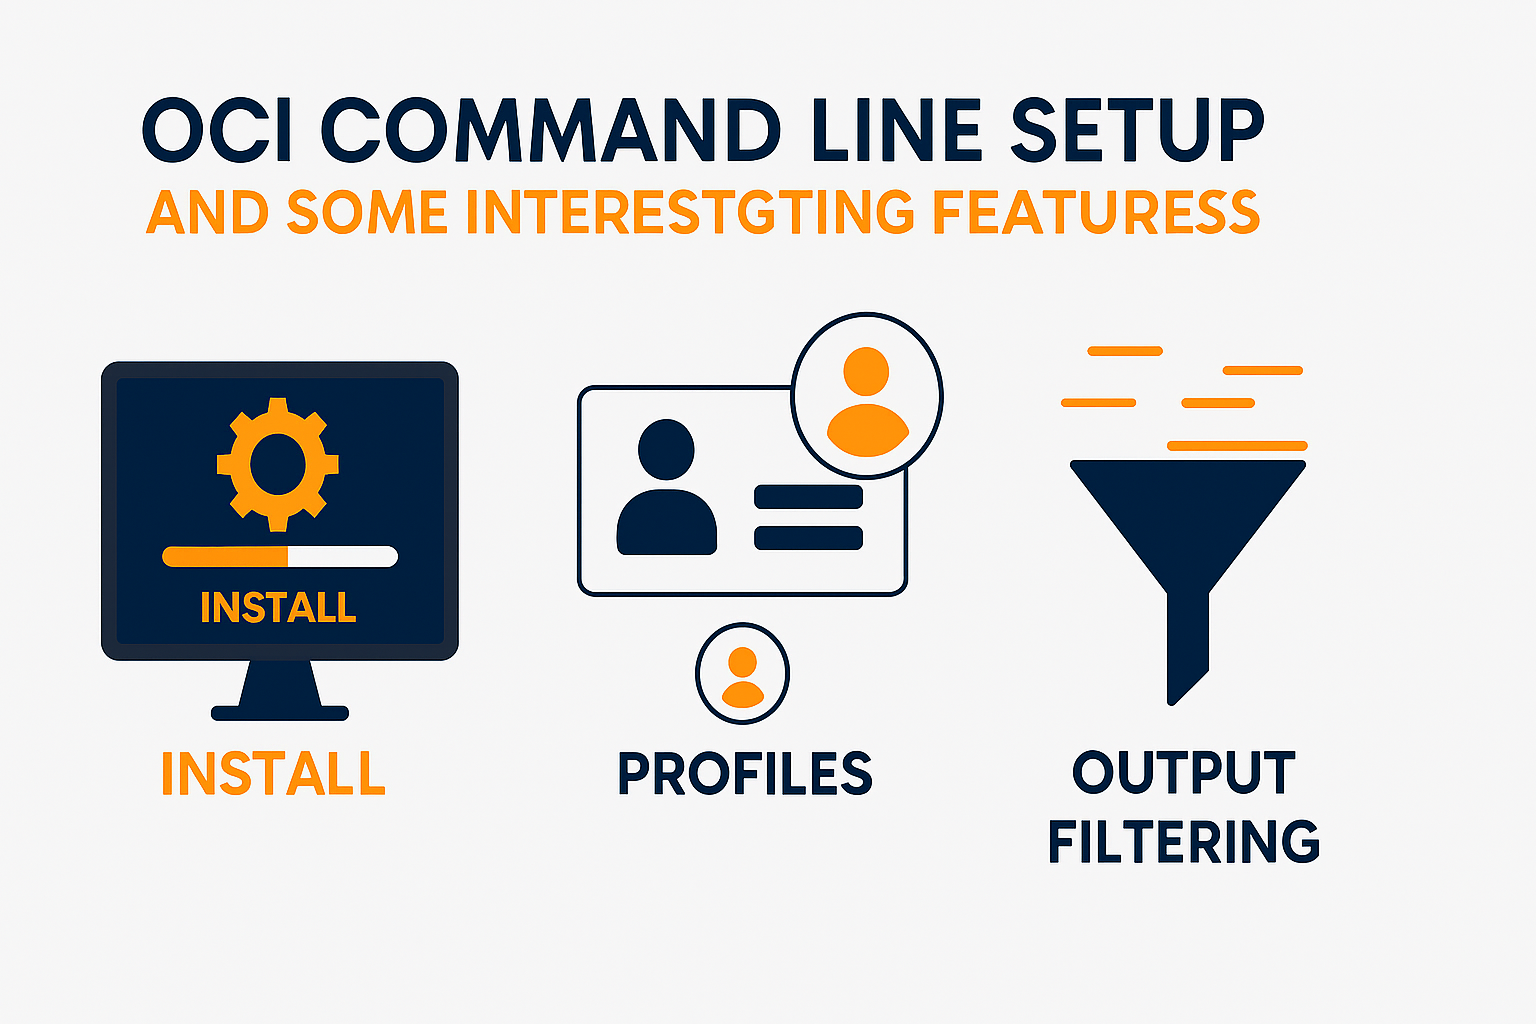
This article shows how to install and configure OCI command line under Linux OS. It also covers some features that may ease your life when using the tool like: profiles, output filtering, generating and reusing templates for creating objects in the cloud.
Install.
The “new” OCI command line tool is actually a next version of formerly bmcs. It is now called simply oci.
The installation process is fully automated you just need to run the following command under the user you plan to use it.It takes care of installing all dependent packages and updates your user’s environment (it asks for confirmation on every key step) including auto completion.
[oracle@myhost ~]$ curl -L "https://raw.githubusercontent.com/oracle/oci-cli/master/scripts/install/install.sh" | bash
Configure.
After the installation if you have changed your mind about the configuration – you can always change it e.g.
[oracle@myhost ~]$ oci setup config

Enter a location for your config [/home/oracle/.oci/config]:
File: /home/oracle/.oci/config already exists. Do you want to overwrite? [y/N]: y
Enter a user OCID: ocid1.user.oc1..xxxxxxxx
Enter a tenancy OCID: ocid1.tenancy.oc1..xxxxxxxx
Enter a region (e.g. eu-frankfurt-1, us-ashburn-1, us-phoenix-1): us-phoenix-1
Do you want to generate a new RSA key pair? (If you decline you will be asked to supply the path to an existing key.) [Y/n]: Y
Enter a directory for your keys to be created [/home/oracle/.oci]:
Enter a name for your key [oci_api_key]: File /home/oracle/.oci/oci_api_key_public.pem already exists, do you want to overwrite? [y/N]: y
Public key written to: /home/oracle/.oci/oci_api_key_public.pem
Enter a passphrase for your private key (empty for no passphrase):
Repeat for confirmation:
File /home/oracle/.oci/oci_api_key.pem already exists, do you want to overwrite? [y/N]: y
Private key written to: /home/oracle/.oci/oci_api_key.pem
Fingerprint: 28:a5:c0:53:a4:bc:d9:18:73:20:86:1f:xx:xx:xx:xx
Do you want to write your passphrase to the config file? (if not, you will need to supply it as an argument to the CLI) [y/N]: y
Config written to /home/oracle/.oci/config
In the same manner to generate new pair of pem keys:
[oracle@myhost ~]$ oci setup keys

Enter a passphrase for your private key (empty for no passphrase):
File /home/oracle/.oci/oci_api_key_public.pem already exists, do you want to overwrite? [y/N]: y
Public key written to: /home/oracle/.oci/oci_api_key_public.pem File /home/oracle/.oci/oci_api_key.pem already exists, do you want to overwrite? [y/N]: y
Private key written to: /home/oracle/.oci/oci_api_key.pem
Public key fingerprint: af:a8:98:9e:71:e4:d2:c1:04:1c:75:98:xx:xx:xx:xx
So once oci is installed you need to configure it to connect to your tenancy.
I am going to create a structure of directories and config files for two profiles: [DEFAULT] and [U03] to demonstrate how it handles multiple profiles.Note that profiles could be useful not only for different tenants but also you could differentiate different compartments or even to narrow it down to a database system etc.
I have moved my originally created keys in ~/.oci/keys/default
To reuse this key pair for the second profile:
[oracle@myhost ~]$ mkdir -p ~/.oci/keys/u03
[oracle@myhost ~]$ cp ~/.oci/keys/default/*.pem ~/.oci/keys/u03/
It is a good practice to limit the access to your private keys:
[oracle@myhost ~]$ chmod -R 600 ~/.oci/keys
To register the public key in the cloud go to Identity, then settings.On the left pane choose API keys:

Press Add Public Key button and paste the content of oci_api_key_public.pem that we have generated above.
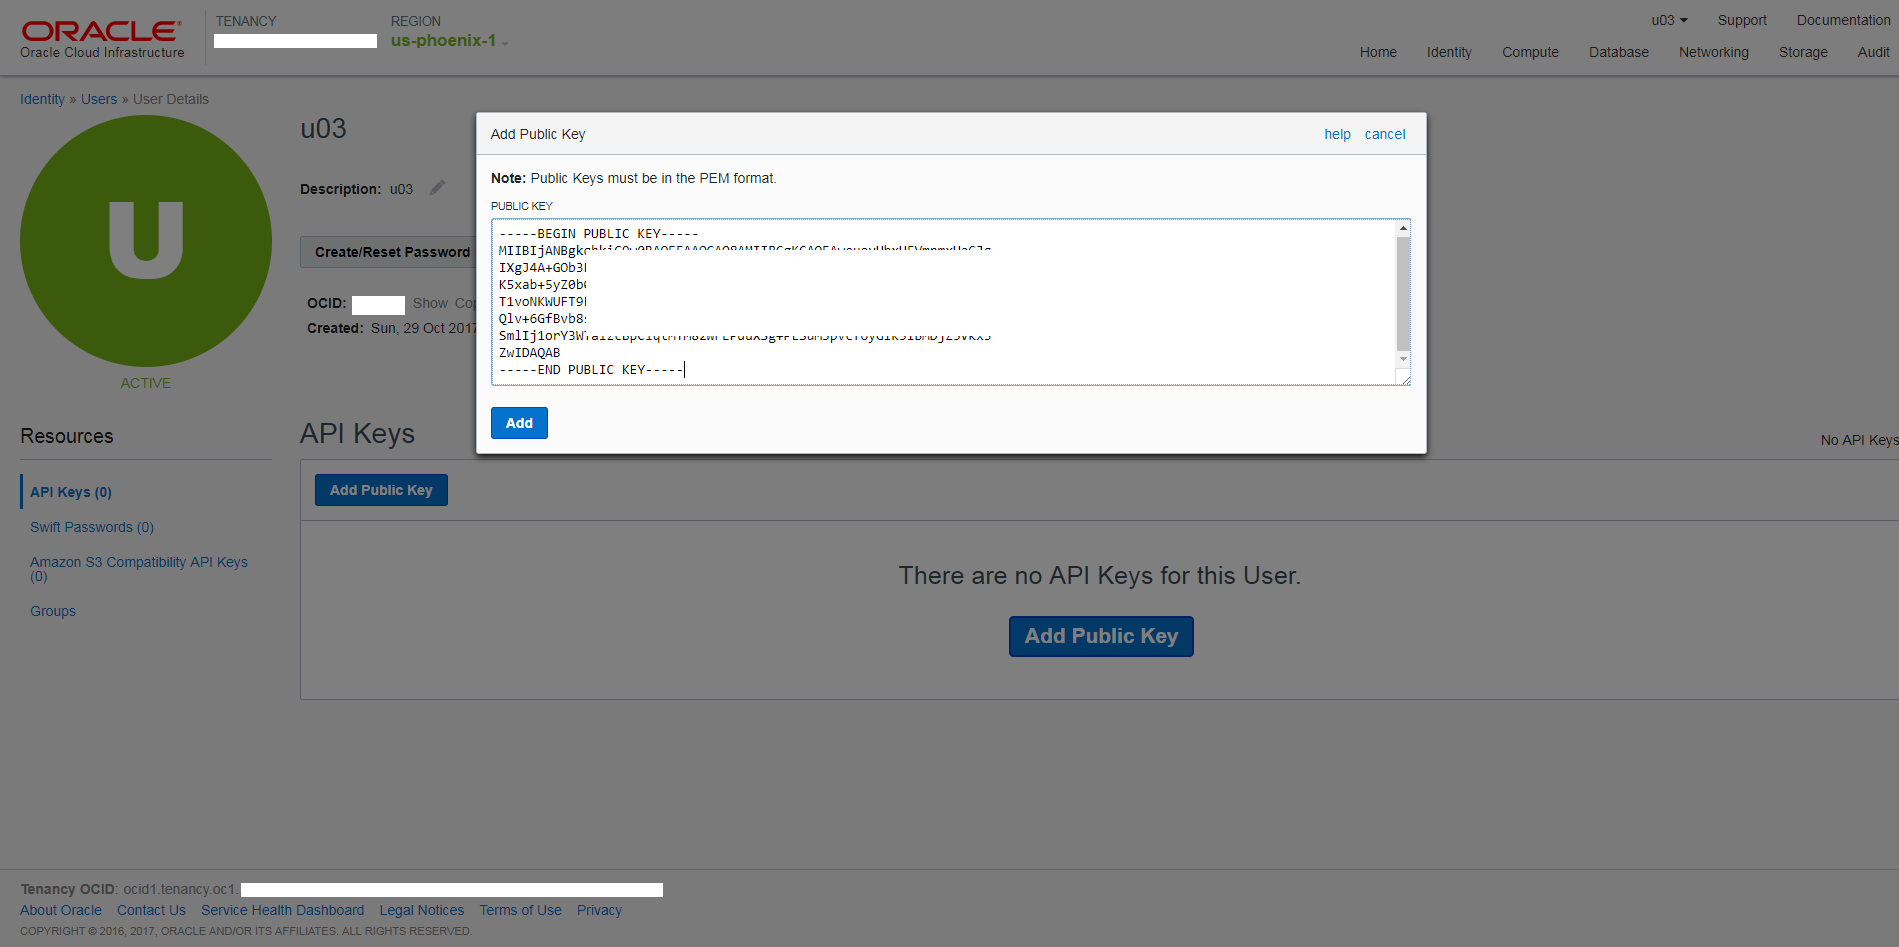
Press Add button and you will see the key along with its fingerprint.

Profiles.
Next we have to create the profiles to point to the exact tenancy/compartment.
Tenancy OCID can be found at the bottom left side of every page in OCI console. Compartment OCID is under Identity then on the left pane select Compartments.
[oracle@myhost ~]$ vi ~/.oci/config

[DEFAULT]
region = us-phoenix-1
tenancy = ocid1.tenancy.oc1..xxxxxxx
user = ocid1.user.oc1..xxxxxxxx
key_file = ~/.oci/keys/default/oci_api_key.pem
fingerprint = e6:5a:af:f9:51:cd:3e:7a:53:b9:ce:xx:xx:xx:xx:xx
pass_phrase = password_for_generated_keys
[U03] region = us-phoenix-1
tenancy = ocid1.tenancy.oc1..xxxxxxx
user = ocid1.tenancy.oc1..xxxxxxx
key_file = ~/.oci/keys/u03/oci_api_key.pem
fingerprint = e6:5a:af:f9:51:cd:3e:7a:53:b9:ce:xx:xx:xx:xx:xx
pass_phrase = password_for_generated_keys


[oracle@myhost ~]$ vi ~/.oci/cli-defaults

[DEFAULT] tenancy = ocid1.tenancy.oc1..xxxxxxx
compartment-id = ocid1.tenancy.oc1..xxxxxxx
namespace = my_tenant_name
[U03] tenancy = ocid1.tenancy.oc1..xxxxxxx
compartment-id = ocid1.tenancy.oc1..xxxxxxx
namespace = my_tenant_name
Some of the parameters are not mandatory, like pass_phrase and namespace but will make your life easier as only essential parameters are typed every time.
The parameter after the brackets are the ones that will be read when you specify the profile. If you miss the profile – automatically is taken [DEFAULT] section from both config files.
Per example the first command returns [DEFAULT] tenancy/namespace and the second one for [U03] profile.
[oracle@myhost ~]$ oci os ns get
{
"data": "A1"
}
[oracle@myhost ~]$ oci os ns get --profile U03
{
"data": "B2"
}
Formatting the output.
By default the output is in JSON format but can be presented as table too:
[oracle@myhost ~]$ oci iam region list --output table --profile U03
+-----+----------------+
| key | name           |
+-----+----------------+
| FRA | eu-frankfurt-1 |
| IAD | us-ashburn-1   |
| PHX | us-phoenix-1   |
+-----+----------------+
[oracle@myhost ~]$ oci iam availability-domain list --output table --profile U03
+------------------------------------------------------------------------+---------------+
| compartment-id                                                         | name          |
+------------------------------------------------------------------------+---------------+
| ocid1.compartment.oc1.xxxxx                                            | XowL:PHX-AD-1 |
| ocid1.compartment.oc1.xxxxx                                            | XowL:PHX-AD-2 |
| ocid1.compartment.oc1.xxxxx                                            | XowL:PHX-AD-3 |
+------------------------------------------------------------------------+---------------+
Filtering and sorting.
Sometimes the output could be long and you may not need to get the full list. For that reason oci supports JMESPath query language to filter and sort the output.
Let’s see the below example, it has only a dozen rows but if you list instances in a big company – may end up returning hundreds of rows unsorted data.
[oracle@myhost ~]$ oci db system-shape list --availability-domain XowL:PHX-AD-3 --output table --profile U03
+----------------------+------------------------+------------------------+
| available-core-count | name                   | shape                  |
+----------------------+------------------------+------------------------+
| 36                   | BM.HighIO1.36          | BM.HighIO1.36          |
| 36                   | BM.DenseIO1.36         | BM.DenseIO1.36         |
| 168                  | Exadata.Half1.168      | Exadata.Half1.168      |
| 2                    | VM.Standard1.2         | VM.Standard1.2         |
| 16                   | VM.Standard1.16        | VM.Standard1.16        |
| 8                    | VM.Standard1.8         | VM.Standard1.8         |
| 84                   | Exadata.Quarter1.84    | Exadata.Quarter1.84    |
| 1                    | VM.Standard1.1         | VM.Standard1.1         |
| 4                    | VM.Standard1.4         | VM.Standard1.4         |
| 336                  | Exadata.Full1.336      | Exadata.Full1.336      |
| 72                   | BM.RACLocalStorage1.72 | BM.RACLocalStorage1.72 |
+----------------------+------------------------+------------------------+
Let say we would like to see only cpu count and shape name.
[oracle@myhost ~]$ oci db system-shape list --availability-domain XowL:PHX-AD-3 --output table --profile U03 \
--query "data [*].{ShapeName:name,CPUcores:\"available-core-count\"}"
+----------+------------------------+
| CPUcores | ShapeName              |
+----------+------------------------+
| 36       | BM.HighIO1.36          |
| 36       | BM.DenseIO1.36         |
| 168      | Exadata.Half1.168      |
| 2        | VM.Standard1.2         |
| 16       | VM.Standard1.16        |
| 8        | VM.Standard1.8         |
| 84       | Exadata.Quarter1.84    |
| 1        | VM.Standard1.1         |
| 4        | VM.Standard1.4         |
| 336      | Exadata.Full1.336      |
| 72       | BM.RACLocalStorage1.72 |
+----------+------------------------+
Now we would like to sort by cpu count so to decide easier which shape is a better fit in our case.
[oracle@myhost ~]$ oci db system-shape list --availability-domain XowL:PHX-AD-3 --output table --profile U03 \ >
--query "sort_by(data,&\"available-core-count\") [*].{ShapeName:name,CPUcores:\"available-core-count\"}"
+----------+------------------------+
| CPUcores | ShapeName              |
+----------+------------------------+
| 1        | VM.Standard1.1         |
| 2        | VM.Standard1.2         |
| 4        | VM.Standard1.4         |
| 8        | VM.Standard1.8         |
| 16       | VM.Standard1.16        |
| 36       | BM.HighIO1.36          |
| 36       | BM.DenseIO1.36         |
| 72       | BM.RACLocalStorage1.72 |
| 84       | Exadata.Quarter1.84    |
| 168      | Exadata.Half1.168      |
| 336      | Exadata.Full1.336      |
+----------+------------------------+
Creating objects in the cloud.
For simplicity sake is taken a VCN (Virtual cloud network). Let’s get the JSON template.
[oracle@myhost ~]$ oci network vcn create --generate-full-command-json-input
{
 "cidrBlock": "string",
 "compartmentId": "string",
 "displayName": "string",
 "dnsLabel": "string"
}
Now we can simply fill in with the parameters we like.You could also remove any parameters that are already under the profile. In our case “compartmentId” is redundant.
[oracle@myhost ~]$ vi exampleVCN.json
{
 "cidrBlock": "10.0.0.0/16",
 "displayName": "VCN09",
 "dnsLabel": "VCN09"
}


[oracle@myhost ~]$ oci network vcn create --profile U03 --from-json file:///home/oracle/work/exampleVCN.json
{
 "data": {
  "cidr-block": "10.0.0.0/16",
  "compartment-id": "ocid1.compartment.oc1..xxxxxxxxxx",
  "default-dhcp-options-id": "ocid1.dhcpoptions.oc1.phx.xxxxxxxxxx",
  "default-route-table-id": "ocid1.routetable.oc1.phx.xxxxxxxxx",
  "default-security-list-id": "ocid1.securitylist.oc1.phx.xxxxxxxxxx",
  "display-name": "VCN09",
  "dns-label": "vcn09",
  "id": "ocid1.vcn.oc1.phx.xxxxxxxxxx",
  "lifecycle-state": "AVAILABLE",
  "time-created": "2017-11-10T13:40:32.999000+00:00",
  "vcn-domain-name":
  "vcn09.oraclevcn.com"
 },
 "etag": "53e56074"
}
The same method could be used to create any object in the cloud from any compute object to full database system.
Oci command line has a wide range of capabilities and can easily be scripted.Here we just covered a few of them.It also could be used as complimentary tool to Terraform and Chef when one is looking into scaling up and automation.
For reference and further details please click here .


More News